Showing posts with label American Civil War. Show all posts

Thursday, May 8, 2025

Rebel Fury

Saw a recommendation on YouTube the other day and bought it tonight. Rebel Fury is a hex-map ACW game by GMT Games designed by Mark Herman. Game lists several famous campaigns like Fredricksburg, Chancellorville, The Wilderness and so on. 

Will give it a run just for fun sake. 

=========================

So play the Frederickburg solo game today. Only option is to play Union; the Confederates are static and do not move or attack. The scenario lasts for three turns. Victory condition for the Union player (me) is that it must be a Strategic victory which means capturing at least four hexes from a selection of seven of which all but one are held by the strongly fortified Confederates. Limited resources are allocated the Union forces with three off-the-map reserve units (one cavalry and two infantry) besides what's already on the game board. 

Game One: Learning the game so it was easily won by the Rebs. 

Game Two: Still learning the game play mechanics. Attacked on the Sunken road position but even with artillery support my forces were easily. Another win for Johnny Reb. And it was by a big margin.

Game Three: Getting the hang of it now but decided to ignore the Sunken road position and attack Hoods isolated position to the south. Managed to break through (using artillery fire spt and HQ spt) but then the game ended. Another CS victory. 

Verdict: Interesting. Going to play solo Fredericksburg again tonight.

=========================

Another round of this interesting online board game by GMT Games. This time with screenshots...!

\

Turn 1. Initial deployment. Same solo scenario from earlier today. Limited pieces on the map board for both sides. Confederates are static: they cannot move from their positions or counterattack although they are allowed to defend if attacked. As Union player you have to capture at least four of objective hexes - the seven red stars. Not sure why the remaining deployment is shown given the objectives are clustered around the Sunken road. 

Every action brings up the dialog box explaining the action which can be annoying after a while. 


The scenario gives the Union player a set amount of movement actions, in this case, it's always nineteen. HQ and detachments are moved first, then units. In this scenario, artillery is static too for some reason.

If outside an enemy ZOC and ZOI, the unit counter can move its maximum movement allowance (usually double on roads and in march formation). Proximity to an enemy will trigger a change of formation (automatic) from march to battle line.


Above shows movement ranges when a unit counter is activated. 


Turn 2: Whenever two opposing unit counters are adjacent at any time, movement ceases and the attack phase takes over (see below). Modifiers are applied (artillery support and HQ support - if within command range of 5 hexes). Die rolls are conducted by the game with the results given at the end of the attack (as shown above). 


Attack resolution is mandatory; you cannot proceed until they're all resolved. Cracking the Confederate position of Marye's Heights is a real tough nut to crack. But if you attack Ransom's position you can affect a breakthrough. But be mindful that Lee's HQ is right behind McLaws position and his presence will inspire the Rebs above and beyond. 

As seen above, I manged to break into the northern end of the Marye's Height position. However I made some poor decision when trying to follow through. Came close but no prize. 


The solitary point won was for holding one hex at the end of the game. Normally, the Confederates have a default 7 points lead at the start of the scenario. Worst loss was 13 - zip. Best result from tonight's effort was losing 4 - 1. 

Off-map movements was odd tonight. Pleasanton's cav detachment appeared at entry point I which is to the rear of the northern end of Confederate defensive line. All he had to worry about was Stuart's cavalry guarding that rear area. But I was unable to affect movement with the Union cavalry; he just sat at the entry point twiddling his sabre. The problem did not occur when I moved the two Union units through entry points J and K. May be a glitch perhaps? Or I haven't yet read through the PDF manual. 

Will play through a couple more times before tackling the major battles of this game. Cheers. 


Thursday, July 25, 2024

24 July 2024: If Only...

Just seen a YT wargaming streamer mentioning Warlord's Epic series. If only I had seen this months back. Impressive looking and would have been ideal for my now-cancelled ACW Red River campaign. 

15mm in strips of 10 figures with command elements is a big appeal. That, and the sizes of the formations obtainable; after all, it's all about the epic battles. And you can go from brigade size to division size without too much hassle. Intriguing. This lot will be my next year's project. Epic indeed.

==========================


Saturday, February 24, 2024

24 February 2024: Revising grand ACW plans

24th February
Been busy with life issues. Coupled with ongoing health issues, it's been a time of numerous ups and downs. Life issues are still there as are the health issues; unfortunately they will never go away. Therefore finding time for my hobby is proving difficult and thus low priority for now.

===================================
19th February
Reviewing situation so far
After three or four days hunting for the rest of my ACW "collection" stored throughout the studio, I am forced to make major changes to my grandiose plans:
  1. Going back to division-level mode. 
  2. My "collection" is not near as big as I thought. Exaggeration and distorted memories are the main reason for over-inflating the size.
  3. Lots of painting before even considering tabling what's left.
  4. Going to use Mr. Wise's core rules for all tabletop games with including adopting parts of Mr. Empson's Tables and Mechanics to embellish the campaign narrative only.
Found more old labels and figures. Some are formed into units but everything - labels and models - have all been tossed into a pile for storage (believing I was done with ACW). Therefore, much sorting out is required. It is an aspect I currently enjoy a lot - solving inconclusive mysteries - probably more than painting minis or playing at the moment because the results are pretty much pre-determined - figures are painted, game is won or lost - yet solving mysteries aren't so clear cut. Hence the interest.

The idea for elevating both divisions to corps-level only happened post-campaign as an indulgent reward for both sides. And because I had accumulate enough figures to warrant the promotion. 

However I still haven't located the written record of the entire campaign, an old harcover folio booklet. Therefore what is compiled so far below is missing a fair amount of information. I know there are more figures but where they are still remains undisclosed.

Reviving the old campaign
Creating anything out of nothing or in a vaccuum is difficult and challenging even if it's fun. Therefore continuity with the existing narrative is both important and convenient as there is already a starting point. Reviving small details like names and status/role counts. Polson is the only brigade commander I remember existing from the start. Tyler and Wilson I believe were replacements for the other originals who were killed off. The fourth, Harris, was added towards the end of the campaign. 

Units and unit leaders came and went during the course of the campaign. I remember that turnover of units and commanders was pretty high throughout for both sides.

For the Union side, details are extremely scarce is all I can say. Early on in the campaign, I had a natural bias towards the Conferates because there was greater opportunity for diversity through their colourful flags and different shades of uniforms but the Union side hung in there throughout the campaign despite their relative "bland" uniformity in attire and flags occasionally broken up by units like the Zoauves and Sharpshooters. Balance was important when creating both formations. 

Basing
Basing was reliant on Mr. Wise's specifications. After the campaign finished however I began re-basing the figures, experimenting with various sizes. For convenience. I settled on six figures to a 40 mm x 40 mm square base although initially I had units on 35 mm x 35 mm bases. But I kept Mr. Wise's rules of two loose figures on single bases - 20 mm x 20 mm - for casualty removal. 

Maintaining coherency
To keep tabs on what's been found so far, I'm using the dot point system to distinguish between the activities of different days (level 1, level 2, etc). It's a frivilous act but one that appeals to my understanding of how everything was put together so no apology for including it.
  • Activity 18th Feb
    • Activity 19th Feb
===================================
The Old Confederate Division
Lieutenant General Lawerton's total force comprised four infantry brigades, one small cavalry brigade, and an ad-hoc artillery battalion by the end of the campaign. Originally it was much smaller. Standard size for infantry units is 20 figures comprising 2 officers and 18 ORs. Among the ORs will be a standard bearer or two and a musician. 

Infantry
Standard size for infantry units was always 20 figures and 2 officers. Among the ORs would be one standard bearer (or two) that was converted from available figures. Occassionally there would be a drummer/musician but drummers were rare and looked dorky. At the time I had figures from Airfix as well as Esci and their musicians were rare and standard bearers did not appeal to my desire to have distinctive flags.
  • Polson's Bde
  • 19th NC Infantry
    • unit reformed
  • 40th NC Infantry 
    • unit found relatively whole
  • 49th NC Infantry
    • unit reformed
  • 32nd Va Infantry (1st Va. Rifles)
    •  unit found (veterans/elite status so fewer figures)
    • NOTE: Another unit found and added to Polson's brigade simply because it was in the same location as the others. However I may have short-changed the other existing units in creating this "new" unit so their inclusion is a temporary measure until I have located the rest of the "collection".
  • Tyler's Bde
  • 6th Tennessee Infantry*
  • 7th Tennessee Infantry (3rd Rifles)
  • 9th Tennessee Infantry 
  • 13th Tennesse Infantry
  • Wilson's Bde
  • 16th Alabama Infantry - 20-figure unit
  • 24th Alabama Infantry - 20-figure unit
  • 8th Mississippi Infantry - 20-figure unit 
  • 37th Mississippi Infantry - 20-figure unit
  • Harris' Bde
  • 6th Texas Infantry
  • 8th Texas Infantry
  • 14th Missouri Infantry - 20-figure unit
Artillery (Thorn) - Units were normally attached to the individual brigades and not constituted into one artillery formation during the campaign.
  • Allen's Florida battery (1 x 3", 1 x 12pdr) - division reserve
  • Neale's* (originally Nebling) North Carolina battery (1 x 3", 1 x 12pdr)
  • Miller's Kentucky Horse battery (1 x 3", 1 x 6pdr)
  • T. Roberts' South Carolina battery (2 x 10pdr Parrots)
  • A. Roberts' Georgia battery (1 x 3", 1 x 12pdr)
  • Baker's Arkansas battery (1 x 3", 1 x 12pdr) - replaced Thorn who was promoted to overall command of the artillery
  • Dylaine's Louisiana battery (2 x 10pdr Parrots)
Cavalry (Russell)
  • 1st Georgia
    • first 6-figure unit found from the other day*
    • plus dismounted skirmishers
  • 2nd Louisiana
    • second 6-figure unit found from the other day*
    • plus dismounted skirmishers
  • 3rd Texas
    • third 6-figure unit found from the other day*
    • plus dismounted skirmishers
  • 6th Louisiana
    • 15-figure unit found from the other day
    • plus dismounted skirmishers
  • 4 more skirmishers found
* Speculated composition simply to "fill out" the listing

===============================
The Old Union Division
Had a brain fart and suddenly remembered the name of the Union division comander, Major-General Collins. The Union forces comprise four brigades of infantry, one small cavalry brigade, and one artillery battalion according to the formation labels rediscovered. Only two of the infantry brigade commanders are named - Dawson (1st Bde) and Awle (2nd Bde). 

Infantry
Same situation as for the Confederates regarding unit size and composition. 
  • 1st Brigade (Dawson)
  • 1st US Sharpshooters (Jefferson) - 20-figure unit found from yesterday
  • 16th Iowa (Fulton?) - 20-figure unit found from yesterday
  • 49th Illinois (W. Smith)
  • 18th Illinois - 15-figure unit from yesterday - possibly Fire Zouaves
  • 22nd Missouri 
  • 2nd Brigade (Awle) - base and rider found but no mount
  • 5th Kentucky Volunteers
    • found unidentified unit (#1)**
  • 20th Indiana
    • found unidentified unit (#2)**
  • 18th Minnesota
    • found unidentified unit (#3)**
  • 38th Indiana - 3rd Rifles (Hapwell)
    • unit found
  • 5th Wisconsin (Zoller)
    • 20-figure unit found**
  • 3rd Brigade (unidentified)
  • 33rd Michigan Volunteers (O'Hare)
    • 20-figure unit found**
  • 19th Michigan Volunteers (Dirth)
    • 20-figure unit found**
  • 50th Ohio (Craig)
    • 20-figure unit found**
  • 4th Brigade (unidentified)
  • No unit labels found
    • 20-figure unit found**
** Found units that have no ID markings have been assigned to labelled units

Cavalry (Fremont)
  • 9th Kentucky - detachment attached to GHQ (Taylor) - found
  • 13th Illinois 
    • 15-figure unit found from yesterday**
  • 4th New Jersey cavalry 
    • 15-figure unit found from yesterday**
  • Dismounted skirmishers found (1 offr & 24 ORs)
Artillery
  • Bty E, 17th New York Field (Dyson) - 2 stands
  • Bty I, 3rd US Field (Coombes) - 2 stands
  • Bty H, 12th Pennsylvania Heavy (H. Taylor) - 2 stands
  • Bty A, 2nd Ohio Field (Leith) - 2 stands
  • Bty B, 1st Vermont Light (Hill) - 2 stands
    • unit found yesterday (incorrectly labelled as Heavy)
  • Unnamed bty found (2 stands)
  • Spare caisson found
Other
    • Standard bearers and flags found
    • Spares found
    • Officers on foot found - loose
============================
20 February 2024
I know there are more figures but am unable to remember where I stored them.

============================
22 February 2024
Am certain the rest of the "collection" exists...somewhere. Not that it's a priority at the moment as I have been laid low by this severe bout of flu that's persisted all week. I can confirm the rest of the collection exists because of this image. 


The figures highlighted are unique to the Union side. And I know I had several such units in my "collection" but have so far been unable to locate them. If I can find them then the "collection" will at least double in quantity.

============================
24 February 2024
The gist of Mr. Wise's ACW Airfix Guide is the rules section located near the back of the book. Here is the first page of that summary listing the basic details to get one moving along.


Cheers
========================

Sunday, February 18, 2024

19 February 2024: CSI Northside - the plot thickens (or not)

If you accumulate as much junk as I have over the years, then you're a hobbyist. If you cannot remember where you've misplaced any of your junk, you're a wargamer. Just don't ask the wife because she will get annoyed, and if you know the old adage, "happy wife, happy life" then you know it's a crock invented by a woman. Despite this obstacle, continue to plough straight on in to your doom...

Went into the studio yesterday and really wished I hadn't. After much rummaging about and trying to remain calm about the fact that despite several attempts at organising and tidying it still looks like the morning-after a heavy session of drinking and carousing with friends and uninvited strangers, I eventually located some more of my ACW collection. 

Had to pull apart the storage box to get at the individual shelves to remove the figures. Good old screwdriver helps to lever it apart after first lifting up one side. Each drawer (cloudy) and frame (black) slots into one another as shown in the photos below.


First drawer opened (image below) revealed three six-figure cavalry "units". To my lazy eyes they are separate due to their different basing, flocking (or lack of) and type. The front unit is entirely all converted artillerymen with artillery horses as mounts; the other two are cavalry models. Also included is a two-gun artillery battery; the name on one of the bases states "Medling's North Carolina battery No.1 gun". Correction therefore to first listing which I mistook the 'M' for a 'V'.


The contents of the second drawer above is nearly all Union except for the one Confederate figure who happens to be a senior commander - Thorn - although what service branch is not identified but the name triggered a faulty memory that he is probably the commander of the Confederate artillery. 

There are two, possibly three, infantry units with officers. I have organised them as 20-figure units when some left over (possibly seasoned or veterans?). A Union senior commander - Freemont (cavalry) is also present. 


Third shelving is all Union infantry. A few familiar units are fairly obvious to an ACW afficionado. One is the green-uniformed 1st US Sharpshooters although there were other specialist units who also wore green to denote their specialist skills. The other obvious unit are the Fire Zoauves. Used the Airfix French Foreign Legion figures. But I also have a few HaT Zouave boxes unopened. The unit on the deeper bases is probably a forgotten experiment. There are a total of four with one unit (centre left) less than the normal 20-figure denoting which either means they're veterans or else are missing figures. 


Fourth drawer contains some of the senior command elements, especially on the Confederate side. Lawerton's command stand includes himself, his personal standard and a mounted aide. An option is an aide on foot who can be also used as a spare senior commander for infantry or artillery. 

Lawerton's four division commanders are behind his command stand. From left to right there is Major General Harris who replaces Polson whom I forgot was killed in the last engagement of the campaign; he is the 1st Infantry Division commander. Polson was the last of the original brigade commanders when Lawerton's corps was just a small division.

Major General Tyler is the 2nd Infantry Division commander. He was formerly the commander of the former 3rd brigade before it was upgraded to the 3rd Infantry Division. Along with Harris, Tyler is now among the longest serving within the corps. 

Major General Wilson replaces Tyler as the 3rd Infantry Division commander. He is a newcomer although I think he was promoted from within the division. 

Major General Russell is the Cavalry commander. He's a noob in terms of longevity compared to the others. 

Accompanying the GHQ is a small cavalry escort detachment (unit ID unknown). Or so I reckon but I can so easily be wrong in my evaluation. 

In the same drawer is the Union commanding general stand. His name has faded away although I do believe he is Major General Collins if fading memory serves me right. No mind. Like Lawerton he is accompanied by an aide and his personal command flag. Two unpainted cavalry figures might be escort or just overflow from another drawer.


Last drawer is mainly two Union cavalry regiments (15 figures apiece - a few needing painting). One formation is actual cavalry, the other is again artillery figures converted to cavalry status. Behind them is a two-gun artillery battery (Vermont heavy) with attendant caissons. 

Iglanced through the other storage container and it's mostly old or spares which isn't good news. I thought I had more but cannot remember where I placed them. 
==========================

18 February 2024: CSI Northside

"...You can't live on past glories, you know..."  wife to me as I flashed an old school report at her

American Civil War: CIS North Brisbane Case File 32978-A-23J - The missing archives
Been going through old stuff lately that's been in storage for so long, binning much (nearly all old papers and documents), salvaging the few worth saving. Luckily for me, the wargaming items still being kept include memories from my former solo ACW campaign from back in the nineties. Stuff like unit labels and minis. It's pointless, I know, and very self-indulgent to bother with all this now when it all needs to go. But then who isn't a hoarder when it comes to hobbies and the like? Anyway, I will use the names from these labels and attach them to the two Army lists generated courtesy of Mr. Empson's Tables and Mechanisms (giving his work a formal label for convenience purpose only). 

The unit names and their commanders themselves bear no relation whatsoever to historical fact. Let me make that clear from the start. Made up on the spur of the moment. Once out there, by my warped reckoning, it sticks unless someone else says otherwise.

Unit names changed over the course of the campaign as commanders were lost and units sometimes disbanded or were replaced due to campaign attrition. I would like to believe that these remnant labels somehow hold clues to what-was, or might lead to further clues. 

The major hurdle however is forgetfulness. I can't always recall where I store things. I am hoping I kept all the unit/cmdr labels from back then as a memory jogger suddenly pops into my consciousness that I recall stuffing a handful of these labels somewhere. But where?

I am using a couple of storage containers that hold part of my ACW collection. Labels still exist but forgotten. What labels exist obviously names those final units or leaders from the end of the campaign.

NOTE: All the guns from the artillery were pressed into service for the ongoing Napoleonic Borodino Project. 

Confederate listing:
  • 2nd Louisiana Cavalry - current cmdr Coulter [2]* who replaced Hill (CSA)
    • contents show no said unit in storage container
  • 1st Georgia Cavalry** - first Russell*** then Cheney before unit replaced/disbanded by 6th La. - label only (CSA)
    • contents show no said unit in storage container
  • 6th Louisiana Cavalry - K. Taylor [4] - label only (CSA)
    • contents show no said unit in storage container
  • 3rd Texas Cavalry - Longman - label only (CSA)
    • contents show no said unit in storage container
  • T. Roberts - South Carolina artillery battery (CSA)
    • 2 crewed stands - no guns
  • A. Roberts - Georgia artillery battery (CSA)
    • 3 crewed stands - no guns
  • Miller - Kentucky artillery battery (CSA)
    • 2 crewed stands - no guns
  • Vedling's Bty - North Carolina (CSA)
    • 1 crewed stand - no gun
  • 1st Maryland Horse artillery - Johns [6] - label only (CSA)
    • contents show no said unit in storage container
  • Neale - North Carolina artillery battery - label only (CSA)
    • contents show no said unit in storage container
  • Baker - Arkansas artillery battery - label only (CSA)
    • contents show no said unit in storage container
  • Allen - Florida artillery battery - label only (CSA)
    • contents show no said unit in storage container
  • Lane - Louisiana artillery battery - label only (CSA)
    • contents show no said unit in storage container
  • 4 unidentified artillery stands with crews only - to be reallocated (CSA)
Union listing:
  • 112th New Jersey Volunteer Cavalry - label only (USA)
    • contents show no said unit in storage container
  • 54th Kentucky Infantry - label only (USA)
    • contents show no said unit in storage container
  • 76th Illinois Infantry - label only (USA)
    • contents show no said unit in storage container
  • Colbert - Head of Union artillery? - listed as #5 in Union senior staff (USA)
  • Bty I, 3rd US Field Artillery - Coombes (USA)
    • 2 crewed stands - #2 & #3 - no guns
  • Bty B, 1st/101st Vermont Horse Artillery - Hill - (USA)
    • 2 crewed stands - no guns 
  • Bty A, 2nd/102nd Ohio Artillery - Leith (USA)
    • 2 crewed stands - no guns
  • Bty E, 117th New York Field Artillery - Dyson - label only (USA)
    • contents show no said unit in storage container
  • Bty H, 112th Pennyslvania Heavy Artillery - H. Taylor - label only (USA)
    • contents show no said unit in storage container
  • 5 unidentified US artillery stands (ID on top of stand painted over; did not bother to label underneath either)
*        Number within [ ] is the commander skill level/rating where shown.
**      I have included this now-defunct formation for the purpose of maintaining the ongoing narrative. 
***    I do remember Russell was promoted to lead the cavalry when Lawerton took commander of his newly-organised corps.

Now let's see what's actually in the storage boxes themselves upon opening. The storage container itself has three drawers that can be compartmentalized to suit needs. Which makes for a total of six drawers revealing.


Mixed content in the first drawer opened and laid out for photocopying. In the foreground are two Confederate infantry units. Former bases were cut up and pasted on to two-man stands at the time post-campaign which now look pretty silly. In the background are parked two lots of six artillery horse teams, with the occasional rider. I went with two-horse teams at the time to spread the teams around.


Second drawer reveals the gun-less crewed stands (artillery). All Confederates. The Artillery bases sizes are as follows:
  • Artillery gun and crew bases = Rectangular 75 mm wide x 35 mm deep (or 3" x 1.5")
  • Artillery horse teams = 4 horses plus rider (where possible). Generic standard size across the board for both sides irrespective of whether light (horse) and field. Heavy would sometimes add another two-horse team to the front to give a 6-horse team. Bases are generally 70 mm long by 35 mm wide (2 3/4" x 1 1/2").
The material for the bases came from spacers I found lying about on construction sites at the time. Talk about wastage. After first clearing with whomever owned them, I grabbed as many as I could. Variable thicknesses but the thinnest are the easiest to craft with. Solid and won't warp over time. And they cost me nothing. Much much superior to card - of any thickness. But then MDF/plywood became more readily available and are now the most popular basing foundation.

Changes were made post-campaign as I tinkered with the resizing  of the infantry basing as with all the basing. For convenience of storage, I began to cut up the units for some stupid reason. Anyway, taking the example of the two Confederate infantry regiments found, the 2-man base size are 40 mm wide by 20 mm deep (or 1 5/8" x 7/8").


Four infantry units. Three I recognise from the campaign by their flocked bases. But they look to have been removed from their original basing and glued to new ones. Unit ID unknown for all three although the flags in the back ground should provide a clue to their origins. 

The 20-figure unit in the foreground is probably a Zouave unit but as to which side I have no idea (not without accessing the archived records) although I suspect it might be Union (blue coats, light blue trousers, red Zouave-looking caps). 

Unit sizes are pretty much speculative at the moment. The unit in the background, for instance, is the largest at 24 figures. This might actually be two 12-fig (Veteran) units combined because the figures look similar. This would make sense of the four flags at the very back. So, most likely there are three Veteran units. The fourth one - 20 figures - would either be Green or Seasoned.


From the same drawer, a closer look at the flags. Foreground is the famed Bonnie Blue flag with the lone star denoting it's Texan. Behind him is the standard bearer for a North Carolina regiment. Right of him is either an early Confederate national flag (before the famed Rebel battle flag became the unofficial favourite). Or it could be Texan as well. In the back is a state flag, origins forgotten.


Fourth drawer. All Union artillery gun crews sans guns. Painted over the original labelling (non-painted stands) so original IDs now unknown although the first listing (above) will give a clue as to likely identity. 


Fifth drawer provided the smallest surprise of just seven figures. A 6-fig. cavalry unit created entirely from converted artillery. Horse mounts are from the artillery horse teams. And the trooper was heavily converted from the original gunner figure seated on the caisson. The mount was assembled on to bases with holes drilled to fit the horses before being glued in. 

All higher-level commanders were labelled in front to denote their significance in-game. I believe this fellow was the commander of Union artillery reserve.


Last drawer yielded another mixed force. Background are Union artillery horse teams, again two-horse with horse handler and caisson. In front of them are four unattached caissons. In the foreground are dismounted CSA cavalry skirmishing pose. 

Case Review: These were all that were found in the two storage boxes recovered from the crime scene so far. The investigating team suspects there are significantly more situated throughout the entire location. Further investigation ongoing.

Cheers.
===========================

Wednesday, February 14, 2024

14 February 2024: It's all about the minor details

"...It's the little details that are vital. Little things make big things happen..." John Wooden

Still reviewing Mr. Wise's booklet. A nagging minor problem has arisen that refuses to lie still and quiet inside my head.

The artillery basing proposed by Mr. Wise is an equilateral triangle (page 13) and describes the firing arc which thereby also happened to be the actual base. But fitting crews always seemed to be of secondary significance. At the time, back then, I did not question or bother with the issue instead simply complying. And figures were individual placed (casualty removal) rather than permanently attached to the base as is the modern trend. 

The modern trend, on the other hand, dealt with the basing problem in a brilliant yet direct manner. What they did - and still do - is keep whatever the base frontage is according to the scale used and simple extended back perpendicular so that the result is either a square or short rectangle. Room for placement of figures. 

The firing arc itself is either within the rules or the player used firing aids such as firing arc templates. 


But, for me, schooled in both ways, the solution offered by both seemed incomplete. I wanted a more direct solution without having to resort to rules or firing arc templates. Then I had a Gunny Highway brainfart. Compromise. Modify. Adapt. Overcome. No face camo...


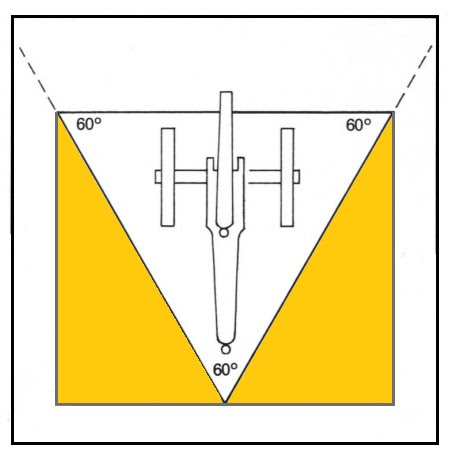
Reconciling both styles - old school and modern - was therefore simplified (a philosophy I adhere to thanks to life): superimpose the triangle on to the square/short rectangle portion so that (a) the firing arc is maintained, and (b) there is room for the gunners to swing their tools of war. 

My initial idea was to "extend" the triangular firing arc from the square/short rectangle basing like so:


Not a fan, to be honest. Too fiddly, and a bit of work to create. And also over-complicating matters. So I went with the next obvious amendement:


Clean. Simple. Successful amalgamation of both styles. There is now room for a gun crew without feeling cramped and limiting (numbers-wise), and the firing arc integrity is maintained. 

If the firing arc is obscured during the flocking process, simply differentiate between both areas by using different flocking: the immediate area surrounding the gun will be trampled down due lots to traffic and other activities; the further out from the gun, not so much.

A roundabout way of reaching the solution for the dilemma posed by myself. But at least that's one less issue to concern my cluttered mind. 

Incidentally, Mr. Wise also uses artillery firing aids - scatter template, canister device, etc - so nothing has changed all that much since this was published back in 1977. More on them and my attempts to reconstruct them. Cheers.
================================

Thursday, February 8, 2024

8 February 2024: Short attention span

Been a fun intense few days jumping down the ECW rabbit hole. For me the warren has so many tunnels to explore and investigate thoroughly that it can quickly become a self-losing venture. So, to spare spawning further any rising frustration or dead-end moments, I will pause here now and draw back a little to re-focus on the many other projects I have awaiting completion this year - the Makeover Year.

American Civil War
Part of my thought process in acquiring Mr. Wise's Airfix Guide involved extracting the necessary background information needed to reverse engineer some adaptation of Mr. Empson's Tables and Mechanics so that I may generate a working ruleset to run (eventually) my Red River campaign. By reverse engineer, I mean nothing as serious or as ludicrous as anything undertaken by the Tofu regime or the Orc Natives. 

I will be using the historical names for the RR campaign as extracted from wikipedia's OOB. But for the early playtesting and rules refinements I am simply going with my imaginary ACW formations - the Union 53rd Corps (Evans) and the Confederate 32nd Corps (Lawerton). As I have previously posted MG Evans' Union formation, here now I present the Confederate side. 

But firstly let me confess: copying to paste from one PC to another doesn't work if they're not connected. D'oh! Tells me I'm still tired from the past few nights. 

Nonetheless, Lawerton's 32nd Confederate Corps is generated using Mr. Empson's Tables sections 3.1 and 3.2. I've decided to name them "units" instead of "regiments" because the latter denotes some fixed and large body of troops which wasn't necessarily so especially towards the latter part of the Civil War. And thereby misleading. The term "units" however gives more flexibility and leeway regarding composition and design, as in it permits play with numbers. So a unit might be anything from an ad-hoc battlegroup of a few companies, a battalion of several companies of varying size and strength, or it might be an under-strength regiment that's taken several heavy losses from recent engagements and actions, or it can be a severely-depleted regiment that's on its last legs, or a legion comprising all three teeth arms of infantry, cavalry and artillery (probably uncommon in 1863), or it might be a locally raised conscripted militia or state militia. Anything's possible therefore. 

I will also amend the Union corps after having read Mr. Wise's text. Both original postings will therefore suffer some unit and formation restructuring to make the whole shebang playable. I mean, I really don't own that many ACW figures in my collection. Close to it but not totally. 

Commander-in-Chief - Lawerton (name resurfacing from my late nineties campaign)
  • 1st Division Polson (another remembered name from the same late nineties campaign)
    • 1st Brigade - 4 infantry units
    • 2nd Brigade - 6 infantry units
    • 3rd Brigade - 4 infantry units
    • 4th Brigade - 5 infantry units
    • 5th Brigade - 5 infantry units
    • 1st Divison artillery - 3 units
  • 2nd Division
    • 1st Brigade - 5 infantry units
    • 2nd Brigade - 5 infantry units
    • 3rd Brigade - 5 infantry units
    • 4th Brigade - 5 infantry units
    • 2nd Division artillery - 4 units
  • 3rd Division 
    • 1st Brigade - 5 infantry units
    • 2nd Brigade - 4 infantry units
    • 3rd Brigade - 6 infantry units
    • 3rd Division artillery - 4 units
  • Cavalry Division
    • 1st Cavalry Brigade - 4 cavalry units
    • 2nd Cavalry Brigade - 6 cavalry units
    • 3rd Cavalry Brigade - 4 cavalry units
    • 4th Cavalry Brigade - 5 cavalry units
    • 5th Cavalry Brigade - 4 cavalry units
    • 6th Cavalry Brigade - 6 cavalry units
  • Corps Artillery Reserve
    • 1st Battalion - 5 units
    • 2nd Battalion - 5 units
After thoroughly reading, reviewing, and totally enjoying Mr. Wise's Airfix Guide all over again after all these decades, revising my ACW imaginary lists is definitely on the cards. Not a criticism nor a rejection of Mr. Empson's work but I fear not everything was disclosed when he generously donated his Tables and Mechanisms for public scrutiny. And there is also the factor that I probably failed to understand the instructions when generating the units and formations (I cite my recent design work on the ECW Orders Cards as proof that I need to de-wax my taringas when it comes to hearing right). I suspect that the latter might be the case. Anyway, here is a quote from Mr. Wise that made me laugh out loud. And reinvigorated my well of inspiration which was dried out last year.

"...wargaming is a highly individualistic hobby, and there are really no rules except those you make yourself..."   (p7, Wise. T, Patrick Stephens Ltd, Cambridge, 1977)

Point worth remembering - for me especially. Of late, I have lost my way a little. Burn out? Not really. Just flat maybe. Need an injection of good old wargaming medicine. Touch base with my origins, so to speak. As the author points out a few sentences later,

"...periodically, as the rules become too unwieldy, people revert to their original simple rules of two or three pages in order to just gain the maximum enjoyment from a game..." 


And I am finding much that I had forgotten or that knowledge was gradually replaced as the wargaming years progressed and I was exposed to many other subsequent rules. Times change many things. Obviously. The current meta seems more into "playing the game" and not the period with blocks of minis. To what end? The same outcome is reached across the board but it's a lifeless kind of outcome irrespective of period, rules, or innovations. It's been the fashion for many years now whereby historical rules are a bland entity clothed in historical costume. It's all about convenience, and looking good, from my observation. I really don't like that fad or I've grown weary of it. 

For instance, Mr. Wise makes valid again certain elements and aspects of ACW wargaming that drew me in all those years ago in the first place. Stuff such as how much influence an artillery train has upon deployment and how it will at times influence ensuing tactics,

"...Most wargamers do not bother with limbers, certainly not caissons and baggage wagons, but it should be pointed out that each gun had a limber, a caisson with ammunition, and the battery as a whole extra caissons, a baggage wagon to each gun, and a field forge. This clutter of vehicles often caused problems on a battlefield,  where the gun and caisson horse teams were drawn up to a depth of 47 yards..."  (p21)

Convenience dictates we simplify it and thereby lose a certain aspect of period "feel". And how much more interesting would it make the game if somehow a ruleset incorporated this aspect. As Mr. Wise points out, "...Such models will cause loss of manoeuvre..." but how much more interesting would that situation add to the gaming experience itself. 

I'm about two-thirds of the way through re-reading the Guide. And already it's given me a boost to my motivation. I will complete the review and give a summary. Cheers.
===========================

POST EDIT: 9 February 2024

The more I read into this text, the more I see myself using Mr. Wise's rules (adapting more like) because they suit me to a T. But I will also utilise parts of Mr. Empson's Tables and Mechanism (especially his unit/formation creation and terrain generation, both of which I find very detailed and extremely useful in adding "more colour" to the individual engagements proposed). In fact I will tweak the best bits from both to run my Red River campaign although I was sorely tempted switch to Mr. Wise's 1862 Peninsular campaign because it looked interesting enough from the standpoint that he has presented the outline of the campaign; all one has to do is fill out the details. Cheers. 
===========================

Sunday, February 4, 2024

4 January 2024: Everything happens of its own accord

While researching cavalry standards for the English Civil War, I found a book I've been searching for since I lost my own copy in the early 90s.

Terence Wise's Airfix Magazine Guide 24: American Civil War (1977) was my main go-to ruleset after Donald Featherstone's seminal Wargames (1962). This little booklet was the main inspiration behind many of solo ACW games and even my late 90s solo campaign. 

Now I have a very good quality PDF copy. By that I mean everything is legible, both text and imaging. Found it both by luck and persistence. Good luck finding yours.


======================

As for the ECW cavalry standards, I should bite the bullet and simply purchase Steve Archibald's excellent reference titles (there are two in the series I believe). It will save me on time wasting. As one blogsite reviewer pointed out (among others no doubt), they're an excellent source of information on various ECW flags because the book is all illustrations. 

Instead, I am spending time doing needless research with no real clue where to look. The best source are the original sources but accessing them requires jumping through various hoops that I'm not prepared to undertake. My usual lazy man's approach of searching online comes with severe limitations and often relies more on luck than any basic research skills. I vainly persist however.

Started on my own range of copies of the excellent range of ECW standards last night based on those already available commercially. Reasons: (1) I don't appreciate watermarks on my flags, (2) As commercial entites they cost which, again, I protest because it's pretty obvious that anyone can recreate these product freely, and (3) following on from (2) I like being creative. 

There are discrepancies between same flag identities having different colours or devices. Inital guess for this is that they're earlier and later versions. Units shifted around, were reorganised, received new commanders, new postings, and so on. No mind; they give me the luxury of choice. 

Below is an example showing my progress so far in recreating my own ECW flags graphically. This is my copy of Sir John Gell's Regiment of Foot # 2 based on the Flag of War website item. 


The base template for all Foot flags - background - was created in MS Paint (I love my old tools). Getting the folds and shading has been hit and miss but sufficient as an experiment. The actual final designs may go solely 2D in look. Or not. I've done multiple colours - black, white, blue, green, purple, yellow. Next, I've added the St George Cross in the upper left corner to complete the template. The subsequent company flags cater for variants (depending on devices used). For the example above I simply added two inverted 5-point stars and voila!

The cavalry cornets have also been given similar treatment to the infantry standards - a base flag colour background and then adding the various choices of flag trim before applying the numerous devices and emblems. 


The example above is based on an actual Parliament unit whose name eludes me at the moment. This is one of the companies. The source I am using has Latin mottos but I can't decipher or distinguish properly because the image I working with as source is so tiny. Needless to say, there is loads of further work needed to improve to finish status - sizing, placements, designs, etc. 

The entire flag group as a whole is only at the start stage. At least a start has been made. Cheers.
=======================
Addendum: 
Instruction on How to create basic and simple double-sided flags using MS Paint.

To get the double sided flag look is really simple. I use the convenience and familiarity of the old MS Paint (Win7/8/10) instead of the latest MS Paint (Win11). It is still the best for basic 2D designs.

STEP 1: Start with your design (by choice I always start with the flagpole side on the left as you're looking at the design). Next, and pretty important step, copy design by keying in Select All (Ctrl + A shortcut) then Copy (Ctrl + C).


STEP 2: Next, expand the canvas (background) area by selecting the handle on the right side of the canvas to stretch your canvas to double the size of your original design as shown below. Be careful of selecting the canvas resizing handle and not the design handle otherwise you will have a very distorted and very stretched out looking image.


I have coloured the expanded area light blue for visual reference; by default it is white. Add a little extra gap for the flagpole (as seen below in the final image).


The copying step now comes into play as you now finish your design. 
  1. Paste (Ctrl + V). The copied image will superimpose itself over the original (you will see handles of the superimposed image: don't touch) in the top left corner by default. Next I use the right arrow key (>) for simple precision sake in moving the new image to its new position on the far right of the canvas. If you have a good eye and steady hand you can select the image and slide it manually. But I have wobbly hands and a wandering eye. 
  2. Next, paste a second copy atop the original. Use the Flip horizontal tool to reverse the design without moving the second copy. It should look like the above image. 
  3. I tidy up by using the Fill tool to colour in the background which in this example is your base Green colour of this flag design. Or whatever source material tells you.
Voila! You now have a double-sided 2D image of the flag.

NOTE: This is my approach to creating simple double-sided 2D flags using MS Paint. Very basic but quick. You will, no doubt, find a more convenient or quicker approach. There are a plethora of other more suitable graphical design programs, preferably those that generate vector designs as opposed to the pixelated effect that I use a la MS Paint. You're really spoiled for choice. I recommend going with what you're comfortable using.

The graphical devices (the cloud, the sword and arm, and the scroll banners) created in the above example were all done using the various Shapes and Brushes tools. And the Flag folds was created using the Spray Paint Brush tool (widest setting and fast runs) along with excellent shades generated using the Colour swatch tool to break up the plain and flat 2D background. Not ideal or perfect but sufficient for my needs; at least there is no Watermark.